For years my feet fell asleep when I rode. Laurie kept on telling me it was because I was jamming my feet forward. But I just couldn't stop it. I rode in a barn mate's saddle complete with those fancy wide-track stirrups. And my feet didn't fall asleep. So I set out to find a pair of my own.
Starting this year (December maybe, I'm not really sure) USEF rules will change and all black stirrups will not be allowed in equitation classes. Equitation is my favorite division, so I set out to find non-black wide-track stirrups.
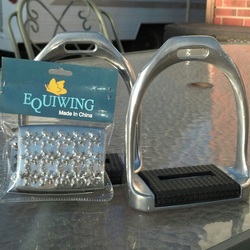
Enter Equiwings. Long story short, they were the only non-black wide track stirrups I could find.
First impression: these suckers are huge! And not foot bed is wide huge. Tall and thick huge. They are a good two inches taller than my regular irons.
The stirrups come with two sets of foot pads, rubber and cheese grater. I never rode in the rubber ones, because I am a cheese grater fan. These cheese graters are not nearly as sharp as the ones that go in my jointed stirrups. I like this texture better, as it doesn't scratch my saddle and leathers like the others do. The pad are attached with four screws on the underside. It should be simple to change them. It wasn't. The screws weren't long enough. It was kind of a pain to dig through the junk in my garage and find one that would work. I suspect that I got a mildly defective pair. Why else would the pad be bent slightly so that the screws didn't fit?
The foot bed is indeed wide, around twice as wide as regular fillis irons. The width is such that I cannot get my heels nearly as far down as I could before without losing contact with the foot bed. But since I was hamming my heels at a 45 degree angle, this is a good thing. First time I rode in them, I could immediately feel if there was jamming going on. They are very secure and I feel like I have a great base of support. The wider foot bed also distributes my weight better then my regular stirrups. My feet don't fall asleep in these stirrups. In my old irons they fell asleep every single ride.
The finish is a matte aluminum, not shinny like you would expect from a stirrup. I haven't tried to polish them up. Maybe I'll get inspired and report back on how well they shine up.
My biggest complaint about these stirrups are how light they are. When I drop my stirrups, they bounce everywhere. The aluminum bangs against my spurs and makes an annoying noise. If I cross the stirrups, the pads rattle and make a different annoying noise. I understand that light is a sought after trait for many people, but unfortunately, it isn't for me.
Over all, these stirrups were a fine purchase. They were only $71 and they keep me from heel jamming. They also come in black plastic and in the jointed version. I do wish they would make them in a regular weight, and height. I'm sure there is a point to ultra light weight stirrups. I just wish I knew what it was. I can't imagine a benefit to them being that big.
Starting this year (December maybe, I'm not really sure) USEF rules will change and all black stirrups will not be allowed in equitation classes. Equitation is my favorite division, so I set out to find non-black wide-track stirrups.
Enter Equiwings. Long story short, they were the only non-black wide track stirrups I could find.
First impression: these suckers are huge! And not foot bed is wide huge. Tall and thick huge. They are a good two inches taller than my regular irons.
The stirrups come with two sets of foot pads, rubber and cheese grater. I never rode in the rubber ones, because I am a cheese grater fan. These cheese graters are not nearly as sharp as the ones that go in my jointed stirrups. I like this texture better, as it doesn't scratch my saddle and leathers like the others do. The pad are attached with four screws on the underside. It should be simple to change them. It wasn't. The screws weren't long enough. It was kind of a pain to dig through the junk in my garage and find one that would work. I suspect that I got a mildly defective pair. Why else would the pad be bent slightly so that the screws didn't fit?
The foot bed is indeed wide, around twice as wide as regular fillis irons. The width is such that I cannot get my heels nearly as far down as I could before without losing contact with the foot bed. But since I was hamming my heels at a 45 degree angle, this is a good thing. First time I rode in them, I could immediately feel if there was jamming going on. They are very secure and I feel like I have a great base of support. The wider foot bed also distributes my weight better then my regular stirrups. My feet don't fall asleep in these stirrups. In my old irons they fell asleep every single ride.
The finish is a matte aluminum, not shinny like you would expect from a stirrup. I haven't tried to polish them up. Maybe I'll get inspired and report back on how well they shine up.
My biggest complaint about these stirrups are how light they are. When I drop my stirrups, they bounce everywhere. The aluminum bangs against my spurs and makes an annoying noise. If I cross the stirrups, the pads rattle and make a different annoying noise. I understand that light is a sought after trait for many people, but unfortunately, it isn't for me.
Over all, these stirrups were a fine purchase. They were only $71 and they keep me from heel jamming. They also come in black plastic and in the jointed version. I do wish they would make them in a regular weight, and height. I'm sure there is a point to ultra light weight stirrups. I just wish I knew what it was. I can't imagine a benefit to them being that big.

 RSS Feed
